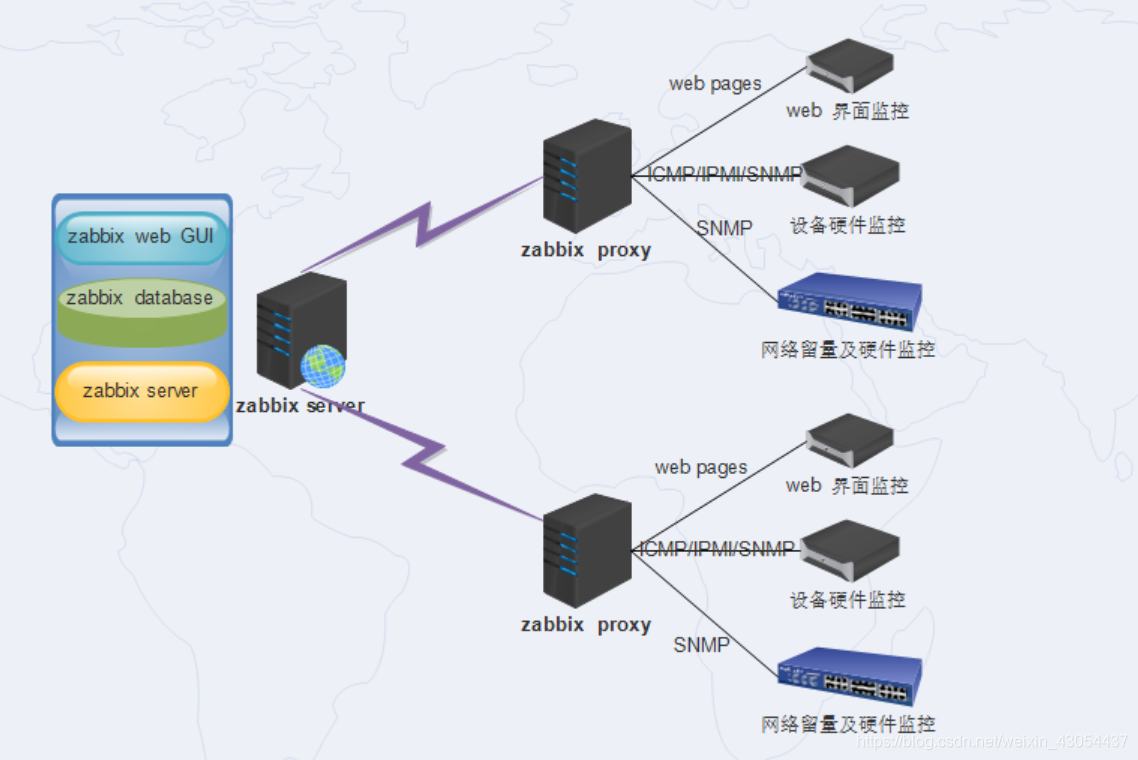
Zabbix 原理图示
如下图,也可以不使用zabbix proxy,zabbix-agent直接将采集到的信息传输给zabbix-server。

Zabbix 监控流程
agentd 需要安装到被监控的主机上,它负责定期收集各项数据,并发送到 zabbix server 端,zabbix server 将数据存储到数据库中,zabbix web 根据数据在前端进行展现和绘图。这里 agentd 收集数据分为主动和被动两种模式:
主动:agent 请求 serve r获取主动的监控项列表,并主动将监控项内需要检测的数据提交给 server/proxy
被动:server 向 agent 请求获取监控项的数据,agent 返回数据。
zabbix-server 监听端口:10051 ; Agent 监控端口 10050 。 服务端安装 Zabbix Server 和 Zabbix Agent 两个服务,客户端只安装 Zabbix Agent 一个服务。
安装zabbix服务
先停用防火墙
systemctl stop firewalld
Systemctl disable firewalld
setenforce 0
安装 Zabbix repo 库
# rpm -Uvh https://repo.zabbix.com/zabbix/5.0/rhel/7/x86_64/zabbix-release-5.0-1.el7.noarch.rpm
# yum clean all
安装 zabbix-server 和 zabbix-agent
yum -y install zabbix-server-mysql zabbix-agent
安装 zabbix frontend
该步骤只是允许服务器可以案组昂更高版本的 php-fpm.
Enable Red Hat Software Collections
yum install centos-release-scl
编辑配置文件 /etc/yum.repos.d/zabbix.repo
enable zabbix-frontend repository.
vi /etc/yum.repos.d/zabbix.repo

[zabbix-frontend]
...
enabled=1
...

:wq

yum install zabbix-web-mysql-scl zabbix-nginx-conf-scl
这里使用nginx作为zabbix的前端,zabbix-nginx-conf-scl安装完成后,就不用单独的安装nginx了,如果已经安装了nginx,想使用自己安装好的nginx,只需要稍做更改就可以,参考如下:
创建初始数据库
Make sure you have database server up and running.
说明:这里创建 zabbix 用户的时候,允许其远程访问,如果 server 端跟数据库在同一台服务器也可以设置为 localhost,但是我在安装的时候,web 界面配置的时候总是提示连接失败,就将访问权限更改为可以任意 ip 远程访问,就可以顺利连接了。
# mysql -uroot -p
password
mysql> create database zabbix character set utf8 collate utf8_bin;
mysql> create user zabbix@'%' identified by 'password';
mysql> grant all privileges on zabbix.* to zabbix@'%';
mysql> flush privileges;
mysql> alter user 'zabbix'@'%' identified with mysql_native_password by 'password';
mysql>  select user, host, plugin from user;
+------------------+-----------+-----------------------+
| user             | host      | plugin                |
+------------------+-----------+-----------------------+
| root             | %         | caching_sha2_password |
| zabbix           | %         | mysql_native_password |
| mysql.infoschema | localhost | caching_sha2_password |
| mysql.session    | localhost | caching_sha2_password |
| mysql.sys        | localhost | caching_sha2_password |
| root             | localhost | caching_sha2_password |
| zabbix           | localhost | caching_sha2_password |
+------------------+-----------+-----------------------+
7 rows in set (0.01 sec)

mysql> \q
导入初始架构和数据,系统将提示您输入新创建的密码
# zcat /usr/share/doc/zabbix-server-mysql*/create.sql.gz | mysql -uzabbix -p zabbix
password
Configure the database for Zabbix server
Edit file /etc/zabbix/zabbix_server.conf
BHost=192.168.56.120
DBName=zabbix
DBuser=zabbix
DBPassword=password
f. Configure PHP for Zabbix frontend
Edit file /etc/opt/rh/rh-nginx116/nginx/conf.d/zabbix.conf, uncomment and set ‘listen’ and ‘server_name’ directives.
# listen 80;
# server_name example.com;
Edit file /etc/opt/rh/rh-php72/php-fpm.d/zabbix.conf, add nginx to listen.acl_users directive.
listen.acl_users = apache,nginx
Then uncomment and set the right timezone for you.
; php_value[date.timezone] = Europe/Riga
php_value[date.timezone] = Asia/Shanghai
vim /etc/opt/rh/rh-php72/php.ini
post_max_size = 16M      # def 8M
max_execution_time = 300 # def 30
max_input_time = 300     # def 60
date.timezone = Asia/Shanghai
Start Zabbix server and agent processes
Start Zabbix server and agent processes and make it start at system boot.
systemctl restart zabbix-server
systemctl restart zabbix-agent
systemctl restart rh-nginx116-nginx
systemctl restart rh-php72-php-fpm
# systemctl enable zabbix-server zabbix-agent rh-nginx116-nginx rh-php72-php-fpm
参考:
官网: https://www.zabbix.com/cn/download?zabbix=5.0&os_distribution=centos&os_version=7&db=mysql&ws=nginx
使用手册: https://www.zabbix.com/documentation/5.0/zh/manual/quickstart/login
EOF